Tuesday, May 29, 2012
Group video about our work
Hey everyone!! Check out our new video!! The video is showing the group works that we have done!! Tell us what you guys feel???
Tuesday, May 8, 2012
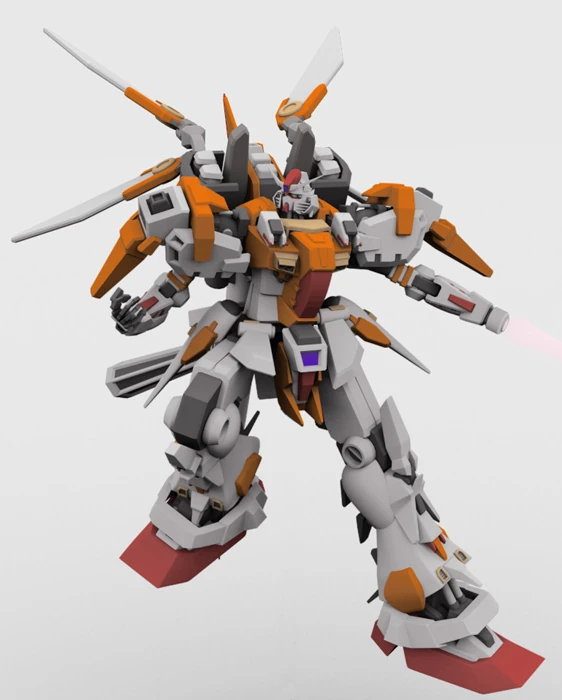
MG MS-18E Kämpfer Completed Photoes
MG MS-18E Kämpfer
Here are the photoes of the MG MS-18E Kämpfer, you can see all the details of the model that we built, we hope you can learn something from it and enjoy the photoes!!


Here are the photoes of the MG MS-18E Kämpfer, you can see all the details of the model that we built, we hope you can learn something from it and enjoy the photoes!!


MG MS-18E Kämpfer Spray Work
Hey, welcome back guys. Today we are going to focus on the colour spray on our MG MS-18E Kämpfer. We decided to make the colour of the body more shine.
Here are the steps:
1: We have to use the surfacer and spray it all over the gundam model to make it in one colour.

 After we spray the surfacer onto our model, it appears in grey colour. Just like this:
 This is the front view
 Details on upper body
 Back view
 Details on the legs


Details on the shoulders
 Details on foot


The reason for us to do this is because it will be very hard for us spray colour or paint on top of the original colour. So we spray the surfacer on the model and make it all in one colour, it will become a base colour for us to do the colour spray. The surfacer has a lot of features such as it will become a good base for us to paint on top of that, it will helps with the paint and let it appeals better quality. So this step is very neccessary and important!
2: We need to spray all the parts in black colour


The black colour is the base of all the metallic colour, it will helps to provide better quality of the metalic colour..
3: After all the parts dry out, then we can start to spray the metalic blue on our gundam, and silver brown or silver on the weapons. It really depends on what you wanna to put on.


 Here are the parts after we spray the metalic blue. It's nice right!!
4: Now we can start to put everything together and make a stand for your gundam model!
 You can compare the photo of gundam that we just made with the photo of the gundam that we built earlier.
 You can see the differences right!! Do you feel exciting as well??

So we have completed the model building , remodeling and the spray work on MG MS-18E Kämpfer. How do you feel about it? Just leave your comments under the post! Did you enjoy today's post?? Just keep with us, and there will be something new coming out!! See Ya on our next post!!!
Here are the steps:
1: We have to use the surfacer and spray it all over the gundam model to make it in one colour.


Details on the shoulders


The reason for us to do this is because it will be very hard for us spray colour or paint on top of the original colour. So we spray the surfacer on the model and make it all in one colour, it will become a base colour for us to do the colour spray. The surfacer has a lot of features such as it will become a good base for us to paint on top of that, it will helps with the paint and let it appeals better quality. So this step is very neccessary and important!
2: We need to spray all the parts in black colour


The black colour is the base of all the metallic colour, it will helps to provide better quality of the metalic colour..
3: After all the parts dry out, then we can start to spray the metalic blue on our gundam, and silver brown or silver on the weapons. It really depends on what you wanna to put on.


4: Now we can start to put everything together and make a stand for your gundam model!


So we have completed the model building , remodeling and the spray work on MG MS-18E Kämpfer. How do you feel about it? Just leave your comments under the post! Did you enjoy today's post?? Just keep with us, and there will be something new coming out!! See Ya on our next post!!!

SD FA Unicorn Gundam

The SD version of gundam is the smaller size gundam which has a big head on it! This is an example of the SD type of gundam model! Looks cute isn't it?
WISP: MG Fang Joker

I can talk about how a pickup truck smashed into the driver side of my car because the driver decided to change lanes on the freeway without looking, leaving my car in the repair shop for two weeks while the truck takes off with its tire polished. Luckily, they are paying for the damage. If I go on with the story, then I must go into a rage fest about the average American drivers here so I’ll just stop here. Since I don’t have any broken bones, I’ll just brush off my injuries as “mere bruises” and move on- I AM part Gundam after all. However, I really appreciate and thank you for your concern this whole time ^^. ANYWAY… Yea, it’s been awhile since I’ve built a MG but it has been even longer since I did something Kamen Rider related so why not have the best of both worlds?
Unit Type
| ZGMF-GTX5x5.v3 ZGMF-GTX5x5.v3 Extreme Hope | |||
|---|---|---|---|
 | |||
| |||
| Profile | |||
| Model Number |
| ||
| Developed from | |||
| Manufacturer | |||
| Operator |
| ||
| Known Pilots |
| ||
| General Characteristics | |||
| Overall Height |
| ||
| Head Height |
| ||
| Max Weight |
| ||
| Standard Weight |
| ||
| Power-plant |
| ||
| Power Ouput |
| ||
| Sensor Range |
| ||
| Accommodation | Pilot only, cockpit in chest | ||
| Armor |
| ||
| Movement | |||
| Max Acceleration |
| ||
| Mass Ratio |
| ||
| Propulsion |
| ||
| |||
| |||
Saturday, May 5, 2012
MG MS-18E Kämpfer Remodeling
Remodeling is the most difficult section and the most fun section in the model building, because it allows gundam model builders use their imagination and their ability of creation to build their own style of gundam model, which in order to distinguishes their gundam to other builder's. It is very dificult because you have to design the model yourself again, where you want to change, where you want to add some details, where you want to change the colour. This is very complicated to do. However, once you finish it, you will have the feeling of success, then the fun part comes!!!
Now, we are ready to remodel the MG MS-18E Kämpfer.
The first thing we need to do is we polish the model again.

We polish the model again because we don't want the surface of the parts to be bumpy.


Now, we start to add some details to the model
We are mainly focus on the leg and foot section.

As you can see, we added some details on the knee and leg armor.

Here is the lining we carved on to the leg armor.

It looks cool. You need to make it to the both legs.

Now, we have extend the leg for 3mm. To do this, we have cut the upper part of leg apart, then we add the modeling plastic in between, and glue them together again.

Here are the lining on the feet.


Here is the look of the legs after we remodel the gundam.

Here is the shoulder section, we extended the spike on the shoulder

Now, the put everything together and compare the size with other gundam model.

After we remodel the gundam, we need to wash all the parts by steep in the soap water for one day. Then we lay all the parts out to dry.The reason we are doing this is because after we remodel the gundam model, there is dust left on the surface of the parts, and we don't want the dust on the parts when we do the spray work. So this step is very important.
 After all the parts dry, we can start our spary work.
But first, we want to show you the spray tools we use to do the spray work.
This is the air brush. We put the paint in this air brush and do the spray work.

This is the air brush compressor.
 This is the model spray booth. We need to use this because when we start to spray, there will be some bad air coming out, so we need to use the booth to suck the air out of the room.

That's it for today, we will keep update our work about the spray work in the next post. So just keep with us. Did you enjoy today's post? You can leave your comment or questions under the post, we are happy to help you. So see you on the next post.
Now, we are ready to remodel the MG MS-18E Kämpfer.
The first thing we need to do is we polish the model again.

We polish the model again because we don't want the surface of the parts to be bumpy.


Now, we start to add some details to the model
We are mainly focus on the leg and foot section.

As you can see, we added some details on the knee and leg armor.

Here is the lining we carved on to the leg armor.

It looks cool. You need to make it to the both legs.

Now, we have extend the leg for 3mm. To do this, we have cut the upper part of leg apart, then we add the modeling plastic in between, and glue them together again.

Here are the lining on the feet.


Here is the look of the legs after we remodel the gundam.

Here is the shoulder section, we extended the spike on the shoulder

Now, the put everything together and compare the size with other gundam model.

After we remodel the gundam, we need to wash all the parts by steep in the soap water for one day. Then we lay all the parts out to dry.The reason we are doing this is because after we remodel the gundam model, there is dust left on the surface of the parts, and we don't want the dust on the parts when we do the spray work. So this step is very important.

But first, we want to show you the spray tools we use to do the spray work.
This is the air brush. We put the paint in this air brush and do the spray work.

This is the air brush compressor.


That's it for today, we will keep update our work about the spray work in the next post. So just keep with us. Did you enjoy today's post? You can leave your comment or questions under the post, we are happy to help you. So see you on the next post.
Subscribe to:
Posts (Atom)